


Introductio To EJB
11/17/10Posted by
Fulto
0 Comments
EJB stands for Enterprise Java Beans.
EJB is a reusable component for local, remote or both clients.
EJB provides high security for webapplications.
Any client can interact with the bean through the Bean Container only.
Bean Container can recive the request of clients , process the client requestrs and send the response to the appropriate client.
There are three types of Enterprise Java Beans.
That are 1) session Beans
2)Entity Beans
3) Message Drivne Beans

Notes On Servlet API or Explain about the servlet packages
11/12/10Posted by
Fulto
Servlet API contains the following 2 paclages.
1. java.servlet
2. java.servlet.http
Package java.servlet
This package contains the following list of classes and interfaces
Interfaces
Classes
This package contains the following list of interfaces and classes
Interfaces
Classes

1. java.servlet
2. java.servlet.http
Package java.servlet
This package contains the following list of classes and interfaces
Interfaces
- RequestDispatcher
- Servlet
- ServletConfig
- ServletContext
- ServletRequest
- ServletResponse
- SingleThreadModel
Classes
- GenericServlet
- ServletException
- ServletInputStream
- ServletOutputStream
- UnavailableException
This package contains the following list of interfaces and classes
Interfaces
- HttpServletRequest
- HttpServletResponse
- HttpSession
- HttpSessionBindingListener
- HttpSessionContext
Classes
- Cookie
- HttpServlet
- HttpSessionBindingEvent
- HttpUtils

How to Install Tomcat Webserver
11/10/10Posted by
Fulto
In this section we will show the process to downloading and installing Tomcat 6 on your computer system. The steps of downloading and installing are easy and you can learn the process very fast. First of all learn the steps of 'How to download Apache Tomcat server on your computer'. Click the link: http://tomcat.apache.org/download-60.cgi and follow the steps according to your requirement to achieve Tomcat server.
Step 1: Installation of JDK:Before beginning the process of installing Tomcat on your system, ensure first the availability of JDK on your system program directory. Install it on your system if not already installed (because any version of tomcat requires the Java 1.6 or higher versions) and then set the class path (environment variable) of JDK. To set the JAVA_HOME Variable: you need to specify the location of the java run time environment to support the Tomcat else Tomcat server can not run.
This variable contains the path of JDK installation directory.
| set JAVA_HOME=C:\Program Files\Java\jdk1.6 |
Note: it should not contain the path up to bin folder. Here, we have taken the URL path according to our installation convention.
For Windows OS, go through the following steps:
| Start menu->Control Panel->System->Advanced tab->Environment Variables->New->set the Variable name = JAVA_HOME and variable value = C:\Program Files\Java\jdk1.6 |
Now click on all the subsequent ok buttons one by one. It will set the JDK path.
Step 2:
For setting the class path variable for JDK, do like this:
| Start menu->Control Panel->System->Advanced tab->Environment Variables->New-> Set PATH="C:\Program Files\Java\jdk1.6\bin"; %PATH% |
OR
First, right click on the
| My Computer->properties->advance->Environment Variables->path. |
Now, set bin directory path of JDK in the path variable
Step 3:
The process of installing Tomcat 6.0 begins here from now. It takes various steps for installing and configuring the Tomcat 6.0.

A Welcome screen shot appears that shows the beginning of installation process. Just click on the 'Next' button to proceed the installation process.
Steps 4:
A screen of 'License Agreement' displays.

Step 5:
A screen shot appears asking for the 'installing location'

Step 6:
A screen shot of 'Configuration Options' displays on the screen. Choose the location for the Tomcat files as per your convenience. You can also opt the default Location

Go to the specified location as " Tomcat 6.0 \conf \server.xml ". Within the server.xml file choose "Connector" tag and change the port number.
Now, click on the 'Next' button to further proceed the installation process.
Step 7:
A Window of Java Virtual Machine displays on the screen

Step 8:
A processing window of installing displays on the screen.

To get the information about installer click on the "Show details" button
Step 9:
A screen shot of 'Tomcat Completion' displays on the screen.

Step 10:
A window of Apache Service Manager appears with displaying the running process.

Step 11:
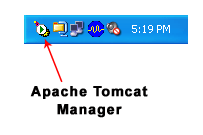
After completing the installation process, the Apache Tomcat Manager appears on the toolbar panel like shown in the below picture.
Configuring Tomcat Manager
To Configure the Tomcat Manager, there are two ways; either user can configure Tomcat directly from the toolbar panel or can configure it from Control Panel Section.i-) Configuring from toolbar Panel
To Configure Apache Tomcat web server from the toolbar panel, you have to press 'double click' on the appeared icon

ii-) Configuration from the Control Panel
To configure the Apache Tomcat Manager, Users will have to follow the follwing steps:
Click on the Start up button -- select Control Panel -- Administrator Tool -- Services -- select Apache Tomcat.
The following screen displays on the monitor.

Double click on the Apache Tomcat. The window of Apache Tomcat Properties appears on the screen.

To operate it, follow the below steps of processing.
Start the Tomcat Server:
1.Start the tomcat server from the bin folder of Tomcat 6.0 directory by double clicking the "tomcat6.exe" file.
OR create a shortcut of this .exe file at your desktop.
2. Now Open web browser and type URL http://localhost:8080 in the address bar to test the server
3. To Stop the Tomcat Server: Stop the server by pressing the "Ctrl + c" keys.
The screen of Apache Tomcat software looks like this:

acd
11/9/10Posted by
Fulto
ajsdgfuiasydtgf ausydtgf oayustd foatdsf uiapstdf otds fouiastdf otdsf oaisd
1. Describe Virtual memory.
2. Describe cache memory.
3. Explain memory hierarchy in detail.
4. Explain how to reduce cache misses penalty and miss rate.
5. Describe symmetric shared memory architecture
6. Write notes on Multiprocessors and thread level parallelism
7. Write notes on multi threading.
8. Write notes on distributed shared memory.
9. Explain how to design an I/O system.
10. Describe RAID.
11. Explain about storage systems.
12 a] Describe data flow design alternatives.
b] Explain the organization of EDDY data flow machine.
13. Describe interconnection network media.
14. Explain how to inter connect the networks.
15 Explain how to design a cluster.
16 Write notes on inter connection networks and clusters.
Subscribe to:
Posts (Atom)